Thank you for the link. I'm going to compare against my own notes.
On a related topic, a friend and I have been working on a (Mango) "Grafting 101" writeup for newbies...something I wish I had years ago.
Some of the terminology we have used may be a little off. Any comments/corrections or experiences from the mango grafting gurus on this forum would be greatly appreciated. Please see below. [edit] Sorry...its a little wordy...[edit] more pictures added per request.
Warren
==============
GRAFTING 101 - Mangos
Mango rootstock preparation:Remove seed from mango seed husk, being careful not to damage the seed.
Place the seed in a moist/damp paper towel.
Place the towel-wrapped seed in a Ziploc bag and remove as much air as possible and then close the Ziploc bag.
Place the Ziploc bag in the shade and check after a week. Roots will start to form in ~1 week.
Picture: Polyembrionic seed starting to form roots
Plant seed when roots form but before any mold starts to form.
Place rooting seed in a 1 to 3 gallon straight nursery pot with fast draining potting soil.
Seed can be oriented with roots facing down
.but roots generally find their own way downward and sprouts find their own way upward.
Multiple sprouts may form from polyembrionic mango seeds (i.e. Manila, Ataulfo).
Place the nursery pot in partial to full sun.
Keep the soil damp/moist, but do not overwater or the roots may rot.
Winter time is generally a tougher time to sprout mango seeds in SoCal, unless you have a greenhouse.
Spring seems to be a better time for growing mango seedlings.
Add a support stick in the nursery pot, carefully inserting so as to not damage the seed and roots.
Tie the growing tree with nursery tie tape to the support stick when the tree reaches ~ 1 foot in height to protect the tree from potential wind damage.
Tools for grafting:Rubbing alcohol in spray bottle: Use to disinfect tools and cutting surfaces after every use and/or cut
Paper towels: Use to dry off the alcohol from tools if using immediately after cleaning
Pruning sealer (same as roofing tar material) and Q-tips: Use to thoroughly seal the grafting union over the parafilm grafting tape (where the graft splits from the original branch) when implementing a veneer graft.
Pruning shears: Use to cut the scion from the source tree or to cut off the top of the rootstock in preparation for a cleft graft.
Grafting knife: Use this one-sided beveled edge to place a slit in the rootstock (for cleft or offset cleft graft) or to create a veneer cut in the rootstock.
Surgeons razor blade knife: Use this double-sided beveled edge knife to cut the V-wedges on a scion. These seem to yield flatter/straighter cuts than the grafting knife (my experience only)
Parafilm-M laboratory film: Use to seal the scion to lock in moisture during scion preparation
Nursery tie tape (1/2 inch): Use to tightly secure the Parafilm-M wrapped scion to the rootstock.
Grafting tape: Can be used instead of nursery tie tape (need to fold so that it becomes like a rubber band.
Aglis Buddy Tape (1/2 in or 1 in): Can be used instead of the nursery tie tape (need to fold so that it becomes like a rubber band)
Parafilm grafting tape (1/2 in): Use to additionally seal the graft union after the scion is securely tied/bound to the rootstock.
Plant tags and lead pencil: Use to identify the rootstock and grafted variety
Best time to graft mangos:I have read that the best time to graft mangos is generally between April through August in Southern California.
Grafting after August is generally more difficult because of the colder fall weather encountered during the crucial scion growth stage.
However, you probably can graft at all times of the year when you gain more experience or dive into a greenhouse purchase.
Mango scion preparation on the source tree:Clean all tools with alcohol before starting and after finishing.
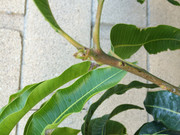
On the source tree, cut the tip off of the potential scion to promote growth.
Budding will occur several weeks later at the top.
Picture: Good choice for scion...buds appear to be starting to swell
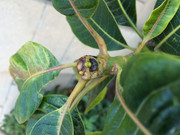
Picture: Probably not the best choice for scion...bud has started pushing
When budding starts, cut the leaves off the potential scion for at least 3-5 inches below the top.
Let the potential scion heal itself (from the leaf cut) for at least a week.
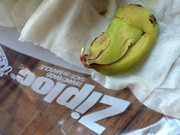
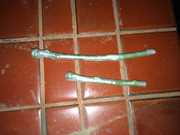
Then, cut the scion off (3-5 inches long) and wrap entirely with stretchable Parafilm-M. Place wrapped budding scion in a Ziploc bag and remove any pockets of air before sealing.
Picture: Prepared scions ready to place in Ziploc bag
 Grafting:
Place prepared scions in a cool area (i.e. cooler) during the grafting process.
Compare the size the rootstock and the scions.
Determine if a splice, cleft, offset cleft (for lack of a better term), or veneer graft should be used.
Splice: scion and rootstock are exact same size diameter
Cleft: scion and rootstock are exact same size diameter
Offset cleft: scion diameter is slightly smaller than rootstock diameter
Veneer: scion diameter is slightly to much smaller than the rootstock/branch diameter.
Once the type of graft is selected, cut the scion at the bottom to match the type of graft method selected.
Smooth, straight cuts are absolutely important.
A single complete cut/pass of the blade is recommended to achieve this smooth and straight cut.
Use the knife blade turned horizontally to judge the scion cut for flatness.
Appropriately slit the rootstock for a cleft, offset cleft, or veneer to closely match scion diameter against the rootstock diameter.
Picture: preparing for cleft graft
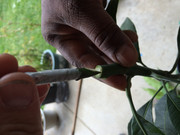
Picture: Offset cleft cut in rootstock shown
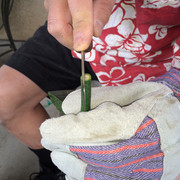
Picture: Safely cutting rootstock with leather glove on non-cutting hand
The idea here is to maximize the cambium layer contact as much as possible.
Slide the scion into the slitted rootstock.
There are 4 cambium locations (one per each segment of the scion V cut; two ends of the V cut) that can be matched.
A minimum of 2 matching cambium locations (edges) is required for grafting success, but having 3 or 4 edges match is better.
Picture: scion inserted into rootstock with 2 matching cambium edges showing
Tie the scion tightly to the rootstock using nursery tie tape, but being absolutely careful not to move the alignment of the scion when the tie is performed.
A tight wrap is critical for success.
Start tie wrap at the bottom of the graft union and work your way to the top of the rootstock.
Tie knot tightly at the top of the rootstock (top of the grafting union).
Note: As an alternate to nursery tie tape, folded grafting tape or folded Buddy tape can also be used to tightly secure the scion onto the rootstock, especially for smaller scions.
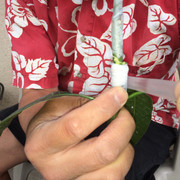
Wrap parafilm grafting tape starting below the nursery tie tape and wrap around to well above the grafting union.
A tight seal is critical to keep excess moisture, micro-organisms, and contaminants from entering the graft union area during the healing process. I have heard that mold could be problem if excess water seeps into the grafting union area.
Picture: Applying Parafilm grafting tape
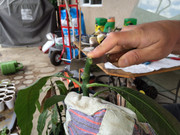
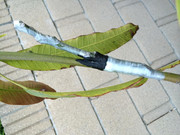
For veneer grafts, pruning sealer should also be applied with a Q-tip where the scion branches off the main branch, because the nursery tie tape and parafilm grafting tape cannot always entirely cover this area.
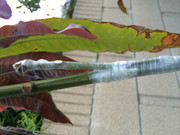
Picture: Veneer graft before pruning sealer applied
Picture: Veneer graft after pruning sealer applied
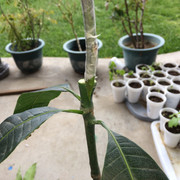
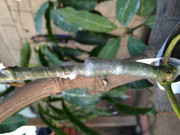
Picture: Final view of cleft graft
 Final steps:
Label the scion with a plant tag using a lead pencil to record the scion variety, rootstock used, and data grafted.
Lead (graphite) pencil marking is more lasting than a pen or sharpie, which can deteriorate quickly in UV/sunlight.
Cover the scion with a bag to provide a shaded area for the scion, but ensure that air can flow into the bag (I have seen differing opinions on this).
Make small slits in the bag so that heat doesnt build up in the bag.
Keep the bag on the scion for 3- 4 weeks.
Picture: The bag with air hole cutouts
Wait 3-8 weeks for scion growth.
For veneer graft, wait for 2 growth flushes of the scion before clipping off the original branch of the veneer grafted tree.
The Parafilm-M and Parafilm grafting tape are biodegradable and will break down with sunlight/heat/UV rays.
However, the nursery tie wrap (if used) will most likely have to be removed in ~1-6 months (but after scion growth flush), as this tie wrap does not break down quickly and may squeeze the plant if left on too long.

