Author Topic: Vermicomposting and Vermicompost Tea  (Read 8294 times)

starch

  • Hero Member
  • *****
  • Posts: 819
  • My brain is like oatmeal
    • Chandler, AZ. zone 9b
    • View Profile
Vermicomposting and Vermicompost Tea
« on: April 01, 2015, 09:00:50 PM »
First things first, I am not an expert nor am I trying to pass this knowledge off as expertise. This post will hardly be definitive or authoritative. But I have been vermicomposting for several years and just wanted to share my experiences for any who may find it useful.

Also, another thing to state up front is that my methodology is based on my experiences (my purpose for vermicomposting) and my environment (my location in Arizona). As such, you will get invariably different mileage based on your purpose and location.

Now with that out of the way ...

When I am talking about vermicomposting I am referring to red worms (eisenia fetida). Good two-page Q and A description here: https://www.bae.ncsu.edu/topic/vermicomposting/pubs/vermicomposting_earthworm_q_and_a.pdf

You keep worms in a 'bin' and there are lots of different ways to construct them and for different purposes. I will talk about several of them that I use in this post. For a more complete list of a lot of different designs, look here: http://www.redwormcomposting.com/category/worm-bins/. But when I talk about a bin, I am referring to a worm container that is not the ground or a garden. Something that is kept inside / in a garage / above ground outside.

I have some pretty specific constraints with my environment in Arizona (a little southeast of Phoenix). I have found that redworms tend to become ineffective around 90-95 F and they start dying above 95 F. (Although the worm cocoons can withstand a much higher temperature). I start getting average temperatures in the 95 F range in June so any worms in my worm bins die (which I discovered to my disappointment the first year I tried it). So what I do is dig a hole in the middle of my gardens or on my fruit tree mounds and in late May I dump the worm bin contents, so they can continue living in a cooler ground environment (and I get the direct benefit of having them in the soil). But what this means is that I need to get new worms for vermicomposting in October when the temperatures cool down again. I don't try to get them back out of the soil because a) it would be ineffective, they have spread out, b) I would cause a lot of damage to the soil and trees uprooting it to sift for worms. You need ~1000 worms to make a pound, and you need a few pounds of worms to do effective vermicomposting.

With that preamble, here is my basic yearly vermicomposting process:

1. In late May I dump all my worm bin contents into my gardens and fruit tree mounds before it gets too hot for the worms
2. In June-September I layer carbon rich contents (leaves mostly) and nitrogen rich contents (old/spent garden plants, tree prunings, green yard waste cut up finely) and composted steer manure. Wet it good and let it sit in the worm bins for very effective hot composting in the AZ summer (lots of thermophilic bacteria).
3. In October I order a fresh batch of worms (5 lbs. is a good amount) and start these in my small worm bins. The compost from the summer is on its way to being broken down, and is a good environment for the worms. I find they take to it right away.
4. In October-January I am feeding the worms in the small worm bins (which I keep in my garage) kitchen scraps (vegetable only), pulverized egg shells and coffee grounds (which they love). Any vegetable food prep waste is good. If the bins start getting too 'mucky' I use SoPhresh cat pine litter (http://www.petco.com/product/126506/So-Phresh-Odor-Neutralizing-Pine-Pellet-Cat-Litter.aspx - it is made only from compressed lumber by-products) to dry it out a little. I sprinkle the pellets right on top and then wait a day for them to start to break down and absorb moisture and then work them into the rest of the bin. One of my small bins is a feed-through worm bin (more on that below).
5. In February after the worm populations have grown in the bins (healthy worm colonies double in size every 3 months or so under ideal conditions) I transfer the contents to the outdoor worm bins to work on the much larger volume of compost. Also at this point my feed-though worm bin is very active and good quality finished compost is coming out of the bottom. I use this compost (which is drier and easier to work with and is free of worms) to make my vermicompost tea.
6. In February-May the large bins continue to get worked on by the worms and I continue to make vermicompost tea. I am still adding vegetable waste to the feed through bin and outdoor bins. It is adding fresh food and diverse nutrients to the worms.
7. Late May, repeat the cycle

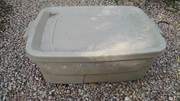
Basic Small Indoor / Garage Worm Bin (Rubbermaid tub design):
------------------------------------------------------------------

This is the basic bin to get everyone started with vermicomposting. Very good tutorials can be found here: http://www.redwormcomposting.com/getting-started/ and here: http://tropicalfruitforum.com/index.php?topic=5679

These links provide all the info you need. I will just show a picture of my bin below


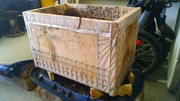
Flow Through Worm Bin:
------------------------------------------------------------------

The basic idea behind a flow through worm bin is that there is a false bottom / screen of some sort that allows air to dry out the wet vermicompost (which is very wet and 'knits' with all the protein in it). Once it is dry it falls out though the screen. You make the bin deep enough so that the vermicompost coming out of the bottom is mostly finished (not a lot of discernible stuff in it). More on the topic and designs here: http://texasredworms.com/tag/diy-flow-through-worm-bin/

My design is small (because I don't need a lot of throughput since I am just a backyard grower and gardener) and is basically 24" long x 10" wide x 12" tall. I have 1" steel mesh on the bottom. The walls are pine board and I stapled plastic sheeting to the inside so that it would hold in moisture better and the wood won't rot. I just bent the screen around the outside bottom of the bin, used a Dremel to cut off the excess in the corners and stapled it to the outside. I have the bin sitting on some blocks for airflow underneath. This is a very basic flow through bin, no bells and whistles.


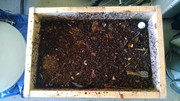
Here is a view of my flow through bin from the top. Note the cheap meat thermometer in the corner, just so I can monitor temperatures and think about moving contents when it gets too hot. This bin is absolutely *loaded* with worms.
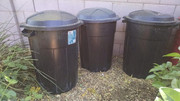


Outdoor Worm Bins:
------------------------------------------------------------------

If my outdoor worm bins look like garbage cans ... it's because that's what they are. The only thing i did was I drilled a bunch of 1/8" holes in the sides (7-8 holes in a vertical row and 8-10 rows around the circumference of the bin) for air flow (worms need to breathe - which they do through their skin). If there were no holes the bottom of the can would be a smelly anaerobic mess.


Red Worms
------------------------------------------------------------------

Once your worms get established, after a few months you want to see lots variation in your population. See this image below that has a lot of adult worms (bigger, redder, and obvious yellow tips), juveniles and baby worms. This means they are happy and establishing their life cycle.


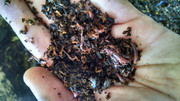
You also want to see lots of cocoons (which is where your new worms hatch from):


Vermicompost Tea
------------------------------------------------------------------

Carlos wrote a post today asking about compost tea: http://tropicalfruitforum.com/index.php?topic=15099.0 and I wrote a response here: http://tropicalfruitforum.com/index.php?topic=15099.msg192118#msg192118 . I will include my vermicompost tea recipe from that post here for convenience.


One of the fertilizers that I use is Urban Farms Bio-Active which has all kinds of good stuff in it including Mychorrizae. I put a handful in the bag with my castings when I brew the tea. However I don't believe the mychorrizae are multiplying during the tea making process. They form a symbiotic relationship with plant roots and do most of their growing and multiplying there (mineral and food exchange with host plant, etc.). But what I think the real benefit is, is that the mychorrizae are evenly distributed in the tea at the end of brewing and when you put it on the plants (I typically do my tea as a soil drench) they are in an environment where roots are immediately stimulated and can form quick bonds with tree roots. My very unscientific take :)

Carlos brought up the good point that BioActive has Bat Guano and Poultry Litter, so does it have place in a tea? (pathogens). This is a good question, and my response is: The chicken litter and the bat guano are both composted, so the heating and breakdown process does help to remove pathogens. And this fertilizer is *very* dry. It has some small dry particles but most of it is powder. So it does seems like it has been fully broken down. I agree, there is some concern there. I personally think the reward is higher than the risk. But I use it also because I have it on hand as part of my normal fertilization regimen. And since I am a backyard grower I don't keep a large variety of fertilizers and inoculants.

So please consider the Bio-Active an *OPTIONAL* ingredient in the tea recipe below. In fact, it is all optional except for the vermicompost.

Resources:

http://www.extension.umn.edu/distribution/horticulture/M1309.html
http://www.redwormcomposting.com/worm-tea/making-vermicompost-tea/
http://faq.gardenweb.com/faq/lists/organic/2002082739009975.html
http://www.bioag.com/images/BioAg_Compost_Tea_Recipe.pdf

2x 5-gallon buckets
20 gallon air pump
Tubing with Tee
2x Air stones
2x Large muslin bag
Long handled brewing spoon

2x 5 gallons of water (sit out overnight to dissipate chlorine)
2x 1 quart of worm casings
(rest of these are optional, but I used them)
2x 3 oz Neptunes Harvest Hydrolyzed fish
2x 2 oz Urban Farms Bioactive Dry (**SEE DISCUSSION ABOVE**)
2x 2 oz Texas Greensand
2x 1 tbsp unsulphured organic molasses
2x 1/2 tsp of Epsom Salts (for Magnesium)
2x 1 oz Apple Cider Vinegar

Collect water into 5-gallon buckets and let sit overnight. Use a food grade plastic bucket (lowes), stackable. Let the buckets sit in the sun during the day to burn off chlorine.

Place aerator in bucket 2 hours before brewing to increase oxygen and further drive out chlorine.

Put the vermicompost and dry ingredients into muslin bags and put in bucket. Dump in rest of the ingredients and give a stir.

Aerate for 24 hours and give a stir halfway through or so.

Turn off pump, remove tubing and use the mixture in the next ~45 minutes

Dilute as needed for your application
« Last Edit: April 01, 2015, 09:26:09 PM by starch »
- Mark

Das Bhut

  • Sr. Member
  • ****
  • Posts: 330
    • Davie
    • View Profile
Re: Vermicomposting and Vermicompost Tea
« Reply #1 on: April 01, 2015, 10:46:25 PM »
I vermicompost too but I use african nightcrawlers and a much less involved system. I keep mine in a 5 gallon bucket in a shed with a paint strainer over the top, I dump coffee grounds and whatever vegetable/fruit scraps I have into the bucket and when the bucket gets full I dump the bucket into another bucket and leave it in the sun so the worms go to the bottom leaving all the older worm castings at the top. I take that top half out and put it under my mulch, the eggs hatch and the new worms live off mulch and the horse manure I worked into my soil. I've only been doing that for a year but at this point there are more worms underneath my mulch than in my bucket.

starch

  • Hero Member
  • *****
  • Posts: 819
  • My brain is like oatmeal
    • Chandler, AZ. zone 9b
    • View Profile
Re: Vermicomposting and Vermicompost Tea
« Reply #2 on: April 02, 2015, 08:22:08 AM »
Das Bhut

Nice, I like that system. Simple and straightforward. My process got more involved because I wanted to increase the total volume of vermicompost that I was generating in a season. I think African Nightcrawlers are great worms. Big and they mature fast. I bet they are great fishing worms for you too. I went with red worms myself because they can handle a slightly larger range of temperatures, particularly on the hot end (which is what drives the timing of my vermicomposting season).

... the eggs hatch and the new worms live off mulch and the horse manure I worked into my soil.

Exactly. I do the same thing. In fact most of my mulch is composted steer manure. We have a blend here easily available at Lowes that is half composted steer manure and half shredded and composted forest products. Makes a good mulch, has lots of organics so it holds in moisture, and the worms love it. It decomposes relatively quickly compared to hardwood bark mulch, but I don't mind replacing it because I know it is being used effectively by the worms and thereby effectively by the trees.
- Mark

Doglips

  • Hero Member
  • *****
  • Posts: 980
    • Houston TX 9A
    • View Profile
Re: Vermicomposting and Vermicompost Tea
« Reply #3 on: April 02, 2015, 10:08:01 AM »
I thought that you don't want nightcrawlers, they have a different diet than the red wigglers.  I thought the red ones are the only ones used in vermicomposting, except for maybe soldier flies, which are pretty nasty.

starch

  • Hero Member
  • *****
  • Posts: 819
  • My brain is like oatmeal
    • Chandler, AZ. zone 9b
    • View Profile
Re: Vermicomposting and Vermicompost Tea
« Reply #4 on: April 02, 2015, 10:18:44 AM »
DogLips

There are three basic types of worms: epigeic, endogeic, and anecic. Anecic worms (like a common nightcrawler you find in most US soils) are solitary / territorial. They need their space and are not good for composting.

Epigeic worms live in clusters near the top of soils. They literally crawl all over eachother and consume organic matter in high density. These are composting worms. There are a few types of epigeic worms used in vermicomposting: Eisenia fetida (Red Worm), Eudrilus Eugeniae (African Nightcrawler), Eisenia hortsenis (European nightcrawler)
- Mark

Doglips

  • Hero Member
  • *****
  • Posts: 980
    • Houston TX 9A
    • View Profile
Re: Vermicomposting and Vermicompost Tea
« Reply #5 on: April 02, 2015, 11:20:39 AM »
Thanks for the info.
So, the issue isn't diet as much as it is lack of brotherly love?
Will they kill each other?  I musta missed the National Geographic special on this.

starch

  • Hero Member
  • *****
  • Posts: 819
  • My brain is like oatmeal
    • Chandler, AZ. zone 9b
    • View Profile
Re: Vermicomposting and Vermicompost Tea
« Reply #6 on: April 02, 2015, 11:38:06 AM »
No problem! I am sure food does have something to do with it. Composting worms live near the top of soils and can consume foods high in nitrogen (like manure). Common Nightcrawlers / Earthworms (Lumbricus terrestris) burrow deep and I would suspect that they prefer a different food source, more likely more broken down (less nitrogren).

I don't know how much (or really if) they actually fight (no teeth or appendages) or how they determine each others territory. Yes, that would either be a really fascinating (worms fighting to the death) or really boring (worms bonking into eachother) National Geographic :)
- Mark

Das Bhut

  • Sr. Member
  • ****
  • Posts: 330
    • Davie
    • View Profile
Re: Vermicomposting and Vermicompost Tea
« Reply #7 on: April 02, 2015, 01:15:16 PM »
No problem! I am sure food does have something to do with it. Composting worms live near the top of soils and can consume foods high in nitrogen (like manure). Common Nightcrawlers / Earthworms (Lumbricus terrestris) burrow deep and I would suspect that they prefer a different food source, more likely more broken down (less nitrogren).

I don't know how much (or really if) they actually fight (no teeth or appendages) or how they determine each others territory. Yes, that would either be a really fascinating (worms fighting to the death) or really boring (worms bonking into eachother) National Geographic :)

If you want to do in ground composting Amynthus gracilus are good choices too

CTMIAMI

  • Hero Member
  • *****
  • Posts: 1972
    • View Profile
Re: Vermicomposting and Vermicompost Tea
« Reply #8 on: April 03, 2015, 08:49:27 AM »
With all the food safety issues and the resistance some of the pathogens are developing. I do have a concern about worm castings and some EColi or salmonella getting into the brew and multiplying. I wonder if there are microbes just to add to the brew that do not include bad pathogens?
Carlos
 Tweeter: @carlosdlt280
www.myavocadotrees.com
zone 10a Miami-Dade County

starch

  • Hero Member
  • *****
  • Posts: 819
  • My brain is like oatmeal
    • Chandler, AZ. zone 9b
    • View Profile
Re: Vermicomposting and Vermicompost Tea
« Reply #9 on: April 03, 2015, 09:59:14 AM »
Hi Carlos,

I definitely understand your concern. I will not try to justify/defend vermicomposting and vermicompost tea making, I will just offer some of my anecdotal experiences:

When I brew my tea, I almost always use it as a soil drench. If used in this manner (I use a watering can because I am a backyard grower, but a fertigator would be used for a larger orchard) the tea and any possible pathogens would be applied directly to the soil. The tree would not transmit these pathogens from the root system / trunk / branches and into the fruit. So vermicompost tea application in a soil based approach should alleviate those concerns.

Occasionally however I do use vermicompost tea as a foliar spray. I have sprayed it on tomatoes, peppers, lettuces, other greens, etc. And this is just anecdotal, not proof of anything, but neither myself nor my family have ever gotten sick or observed any intestinal distress from eating garden veggies that get sprayed. The only rule I observe is that I don't pick veggies the day I spray, I always wait for the next day. This observation does not mean there is not E Coli or salmonella present, but if it was it was never in amounts to make us sick.

My $0.02, and that is about what it is worth :)
- Mark

CTMIAMI

  • Hero Member
  • *****
  • Posts: 1972
    • View Profile
Re: Vermicomposting and Vermicompost Tea
« Reply #10 on: April 03, 2015, 12:36:26 PM »
I understand I was just wondering to be ultra safe if there are vendors that sell compost tested for these pathogens, free of them or just the good microbes so they can be multiplied in the brew.  I'm just trying to be objective  with the realities present today.
Carlos
 Tweeter: @carlosdlt280
www.myavocadotrees.com
zone 10a Miami-Dade County

CTMIAMI

  • Hero Member
  • *****
  • Posts: 1972
    • View Profile
Re: Vermicomposting and Vermicompost Tea
« Reply #11 on: April 05, 2015, 09:13:02 AM »
Started a compost tea without soil compost to see how it goes. Still concerned about food safety issues. Instead using to brew commercial products that have the spores. Also some brew from a friend that brews with these products because of the same concern.

This is it:
5 gal bucked clorine free water
1 cup molasses
! cup brew from a friend
1oz Micro-tes SOS
2 oz Vigoral MOL 2-0-5 from vegetable sources, beets to be exact it has 18% humid and Fluvic acid
3 oz Sure Path a commercial product from Diamond R Fertilizers

I got a reading  at the beginning of the process
PH: 6.35
TDS/500: 3090
PPM Potassium:  1510
Nitrogen PPM: 280

Very powerful stuff just like I would want high on K since it is very hard to keep K in my soil. Started brewing at 8:45 am
Any comments?

« Last Edit: April 05, 2015, 10:26:45 AM by CTMIAMI »
Carlos
 Tweeter: @carlosdlt280
www.myavocadotrees.com
zone 10a Miami-Dade County

starch

  • Hero Member
  • *****
  • Posts: 819
  • My brain is like oatmeal
    • Chandler, AZ. zone 9b
    • View Profile
Re: Vermicomposting and Vermicompost Tea
« Reply #12 on: April 05, 2015, 09:28:34 AM »
Carlos,

Sounds like you are making exactly what you were looking for: a tea with beneficial bacteria and nutrients and removing as possible sources of pathogens. Nice! Yeah, with 1 c. of molasses there will be a lot of food for that bacteria to grow on. Are you aerating it with a air pump + stone or a submersible water pump? I would let it run for 24 hours (maybe even as much as 2 days with that much molasses).

Are you going to do your original plan from the other post: dilute it 400-500:1 for use as a fertigator?

I hope this really works out for you!
- Mark

CTMIAMI

  • Hero Member
  • *****
  • Posts: 1972
    • View Profile
Re: Vermicomposting and Vermicompost Tea
« Reply #13 on: April 05, 2015, 10:19:19 AM »
Yes it is aerating and my idea is to test again in 24 Hrs and see what the parameters tell me has happened. Would be nice to have a microscope to see the before and after.  So you think is too much molasses?
Carlos
 Tweeter: @carlosdlt280
www.myavocadotrees.com
zone 10a Miami-Dade County

starch

  • Hero Member
  • *****
  • Posts: 819
  • My brain is like oatmeal
    • Chandler, AZ. zone 9b
    • View Profile
Re: Vermicomposting and Vermicompost Tea
« Reply #14 on: April 05, 2015, 12:19:03 PM »
I don't know if it is too much molasses. The volume I put in mine is 1-2 tablespoons per 5 gallons. And based on recipes that I have read online from others the volume tends to be 1 tablespoon - 1/4 c. per 5 gallons.

The idea is that the molasses provides an easily digestible food with a lot of micronutrients for the bacteria to grow on. At the end of the brewing process you want the molasses to be completely broken down by the bacteria and any by-products to be fully dispersed in the tea.

Especially with a fertigator, any molasses that hasn't been broken down and is remaining in your tea might 'gum up' your irrigation lines. I don't know how much of a real risk that is, but it is a potential risk. So with that much molasses I would definitely err to the side of a longer brew time.
« Last Edit: April 05, 2015, 12:23:23 PM by starch »
- Mark

greenman62

  • CharlesitaveNB
  • Hero Member
  • *****
  • Posts: 1277
    • [url=https://vgruk.com/]vgr uk[/url]
    • View Profile
Re: Vermicomposting and Vermicompost Tea
« Reply #15 on: April 05, 2015, 02:04:33 PM »
i use spirulina with molasses and worm castings as a tea.
I often just pick out the large worms, and let the small ones and the eggs go in the soil.
i have 4-5 areas in my yard where the compost is very deep.

i have one spot, with several fruit trees around it (kinda like a banana circle)
i pull back 2 inches of leaves,  add lots of coffee grounds, fruit peels etc...
then put the leaf litter back.
ive added compost worms 3 times. but, no need to add more now
my bin is just packed with worms, and i had to get rid of a few.

when i pull  back the leaves, theres a ton of them.
i keep cardboard and newspaper around the foot of the trees too
if i pull up the cardboard, there are a ton of compost worms.
Making worm tea seems almost useless when there are a ton of worms near the tree.

CTMIAMI

  • Hero Member
  • *****
  • Posts: 1972
    • View Profile
Re: Vermicomposting and Vermicompost Tea
« Reply #16 on: April 05, 2015, 03:34:37 PM »
I don't know if it is too much molasses. The volume I put in mine is 1-2 tablespoons per 5 gallons. And based on recipes that I have read online from others the volume tends to be 1 tablespoon - 1/4 c. per 5 gallons.

The idea is that the molasses provides an easily digestible food with a lot of micronutrients for the bacteria to grow on. At the end of the brewing process you want the molasses to be completely broken down by the bacteria and any by-products to be fully dispersed in the tea.

Especially with a fertigator, any molasses that hasn't been broken down and is remaining in your tea might 'gum up' your irrigation lines. I don't know how much of a real risk that is, but it is a potential risk. So with that much molasses I would definitely err to the side of a longer brew time.
I have put molasses mixed with water with my irrigation system. Is not a problem the whole grove picks up the molasses smell, really nice.
Carlos
 Tweeter: @carlosdlt280
www.myavocadotrees.com
zone 10a Miami-Dade County

starch

  • Hero Member
  • *****
  • Posts: 819
  • My brain is like oatmeal
    • Chandler, AZ. zone 9b
    • View Profile
Re: Vermicomposting and Vermicompost Tea
« Reply #17 on: April 05, 2015, 04:01:23 PM »
greenman62,

Sounds like you got a nice system! Yeah, my gardens are absolutely full of worms too, and my tomato plants this year are huge. Also if I dig into my fruit tree mounds, I have to make an effort to not find worms. Good stuff.

Carlos,

Good deal! Yeah, I love the smell of molasses too. I bet this is going to be a really nice fertilization approach for you, please let us know how it turns out!
- Mark

greenman62

  • CharlesitaveNB
  • Hero Member
  • *****
  • Posts: 1277
    • [url=https://vgruk.com/]vgr uk[/url]
    • View Profile
Re: Vermicomposting and Vermicompost Tea
« Reply #18 on: April 08, 2015, 07:18:55 AM »
greenman62,
Sounds like you got a nice system! Yeah, my gardens are absolutely full of worms too,
and my tomato plants this year are huge. Also if I dig into my fruit tree mounds,
 I have to make an effort to not find worms. Good stuff.

its called stealing my neighbors leaf and grass bags when they go out to the trash
that, and 50lb bags of used coffee grounds i get from starbucks. worms love the stuff,
especially, when all 3 are mixed, they break down at different rates which keep the worms around.
 cardboard or newspaper on top keeps the sun out and moisture in giving them a nice home.

yeah, ive noticed castings (or live worms) keep tomato plants very healthy
its a great time to add rock-dust too. The worms create a ton of micro-flora
which turn the dust/minerals into a bio-available form.
That increases the sweetness and taste of the fruits, be it tomato, or fruit trees...

CTMIAMI

  • Hero Member
  • *****
  • Posts: 1972
    • View Profile
Re: Vermicomposting and Vermicompost Tea
« Reply #19 on: April 08, 2015, 08:04:12 AM »
This is how my brew ended.  Big drop in PH not clear why. The Potassium stayed stable but the nitrogen got consumed. I'm looking for a good reference book. I would like to understand what happened here if I brew to long.  Total dissolved solids when up then down. PH dropped drastically after 30 hours or so.   The color was good, no more molasses smell, some vinegar smell at the end. Put is out over 48 hours ago straight into ground and potted plant no death so far.
         
   Brew   4/5/2015            
               
Date   time               TDS/500   PH        K PPM      N PPM
Pre brew   8:00am   3090   6.35        1500       280
4/6/2015   7:00am   3250   6.05        1400       200
4/6/1945   4:30 PM   2850   5.33        1400       170


Carlos
 Tweeter: @carlosdlt280
www.myavocadotrees.com
zone 10a Miami-Dade County

starch

  • Hero Member
  • *****
  • Posts: 819
  • My brain is like oatmeal
    • Chandler, AZ. zone 9b
    • View Profile
Re: Vermicomposting and Vermicompost Tea
« Reply #20 on: April 08, 2015, 10:09:03 AM »
greenman62,
Sounds like you got a nice system! Yeah, my gardens are absolutely full of worms too,
and my tomato plants this year are huge. Also if I dig into my fruit tree mounds,
 I have to make an effort to not find worms. Good stuff.

its called stealing my neighbors leaf and grass bags when they go out to the trash
that, and 50lb bags of used coffee grounds i get from starbucks. worms love the stuff,
especially, when all 3 are mixed, they break down at different rates which keep the worms around.
 cardboard or newspaper on top keeps the sun out and moisture in giving them a nice home.

yeah, ive noticed castings (or live worms) keep tomato plants very healthy
its a great time to add rock-dust too. The worms create a ton of micro-flora
which turn the dust/minerals into a bio-available form.
That increases the sweetness and taste of the fruits, be it tomato, or fruit trees...

Right on :). Yep, I have that in the original post too. Worms *love* coffee grounds. And that fact that you have a nice mixture for differing breakdown rates is great. And I love your observation about the rock dust. I add Texas Greensand to my tomatoes for a Potassium and Iron boost + tons of other micornutrients. Combined with worm poop the plants are literally feasting :) I do the same thing for my mangoes and bananas, both of which are potassium lovers.
- Mark

starch

  • Hero Member
  • *****
  • Posts: 819
  • My brain is like oatmeal
    • Chandler, AZ. zone 9b
    • View Profile
Re: Vermicomposting and Vermicompost Tea
« Reply #21 on: April 08, 2015, 10:18:10 AM »
This is how my brew ended.  Big drop in PH not clear why. The Potassium stayed stable but the nitrogen got consumed. I'm looking for a good reference book. I would like to understand what happened here if I brew to long.  Total dissolved solids when up then down. PH dropped drastically after 30 hours or so.   The color was good, no more molasses smell, some vinegar smell at the end. Put is out over 48 hours ago straight into ground and potted plant no death so far.
         
   Brew   4/5/2015            
               
Date   time               TDS/500   PH        K PPM      N PPM
Pre brew   8:00am   3090   6.35        1500       280
4/6/2015   7:00am   3250   6.05        1400       200
4/6/1945   4:30 PM   2850   5.33        1400       170

Carlos,

Thanks for the update! I suspect the pH being lowered is a bacterial brewing by-product. I make a lot of fermented things. I make my own sourdough bread and Kombucha.

With the sourdough the bacteria/yeast mixture in the starter is what breaks down the flour. The bacteria chomps down on the sugars in the flour and makes an acid as the by-product (which is what makes sourdough sour) and this low pH environment prevents microbes that cause spoilage from taking hold in the mixtures as it ferments, and the wild yeast in the mixture love the low pH environment and it chomps down on the flour sugars and the by-product is carbon dioxide, which is what causes the leavening.

Similarly with kombucha, the bacterias make acid and the yeasts make fizz in the drink. But the acid making bacteria is so strong that if I let it sit too long in the tea, the end product tastes like apple cider vinegar. It is very acidic and sour.

Sound it sounds to me like all your molasses has been successfully converted into microbes + acidic by-products!

If the pH is too low for the trees liking, just add less molasses next time. You will get less microbes, but you will also get less acid so you will be closer to your starting pH.
- Mark


SMF spam blocked by CleanTalk